设计模式概览
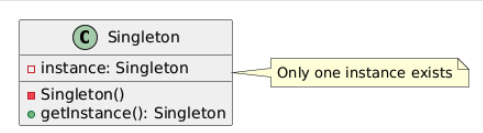
1. Singleton(单例模式)
类别:创建型(Creational)
说明:确保一个类只有一个实例,并提供全局访问点。
使用场景:当需要确保只有一个实例时(例如,数据库连接、配置管理)。
独特性:限制实例化为单一对象。
常见用例:日志记录、线程池、缓存、配置设置。
UML图:
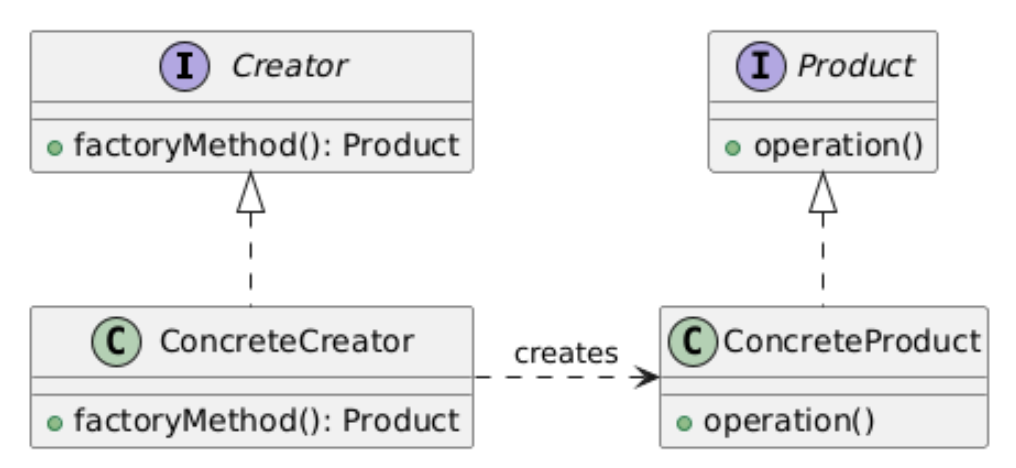
2. Factory Method(工厂方法模式)
类别:创建型
说明:提供一个接口用于创建对象,但让子类决定创建对象的具体类型。
使用场景:当对象创建逻辑需要集中管理且动态时。
独特性:将对象创建逻辑封装在一个方法中。
常见用例:框架、库、依赖注入。
UML图:
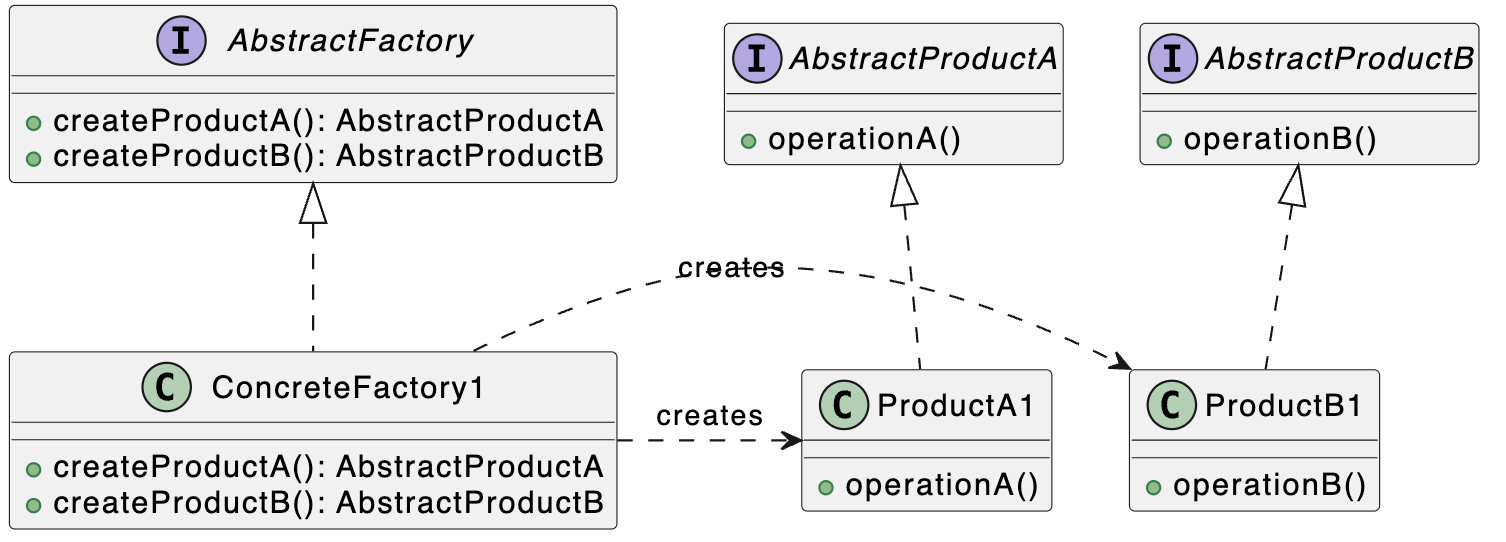
3. Abstract Factory(抽象工厂模式)
类别:创建型
说明:创建一组相关或依赖对象的接口,而无需指定具体类。
使用场景:当需要动态创建多个相关对象家族时。
独特性:封装多个工厂方法。
常见用例:跨平台UI工具包、插件架构、创建复杂对象(例如文档、UI组件、HTTP请求)。
UML图:
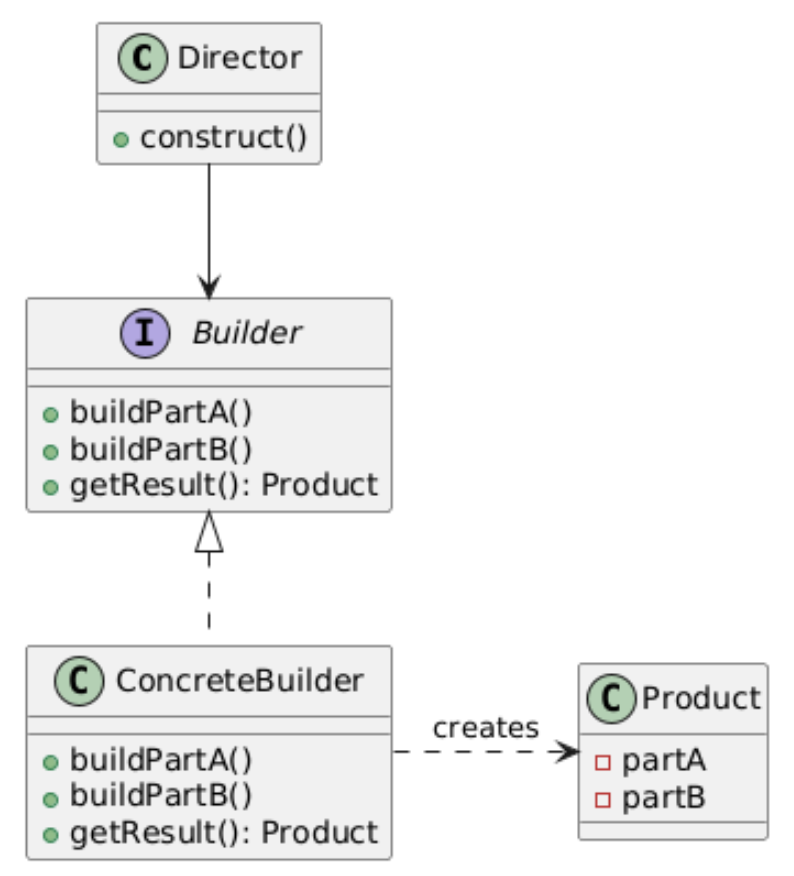
4. Builder(建造者模式)
类别:创建型
说明:将对象的构造过程与其表示分离,允许分步创建。
使用场景:当对象构造逻辑复杂时。
独特性:允许分步构建对象。
常见用例:游戏开发(例如克隆敌人)、对象池。
UML图:
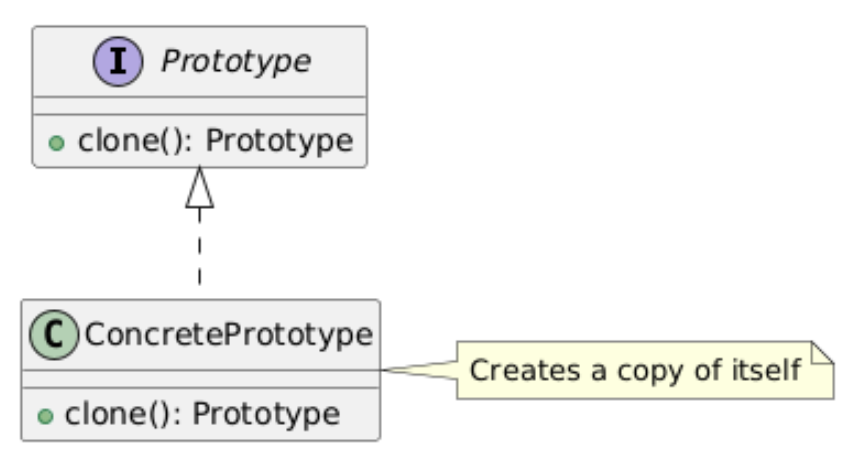
5. Prototype(原型模式)
类别:创建型
说明:通过复制原型实例来创建对象。
使用场景:当对象创建成本高且克隆更高效时。
独特性:通过克隆现有对象创建。
常见用例:游戏开发(例如克隆敌人)、对象池。
UML图:
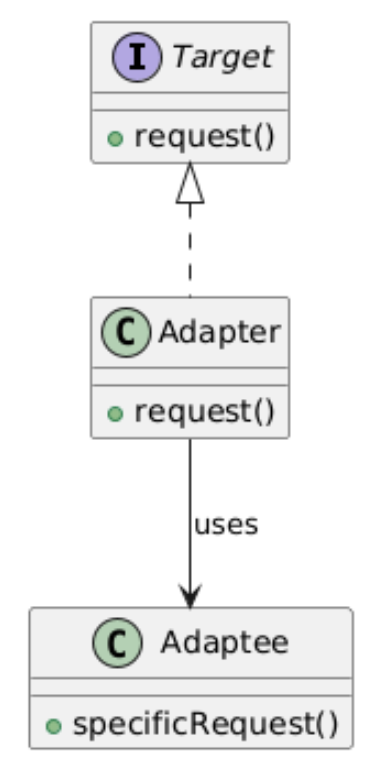
6. Adapter(适配器模式)
类别:结构型(Structural)
说明:允许不兼容的接口协同工作。
使用场景:当需要整合遗留代码或第三方API时。
独特性:作为不兼容接口之间的桥梁。
常见用例:连接遗留系统、API兼容性。
UML图:
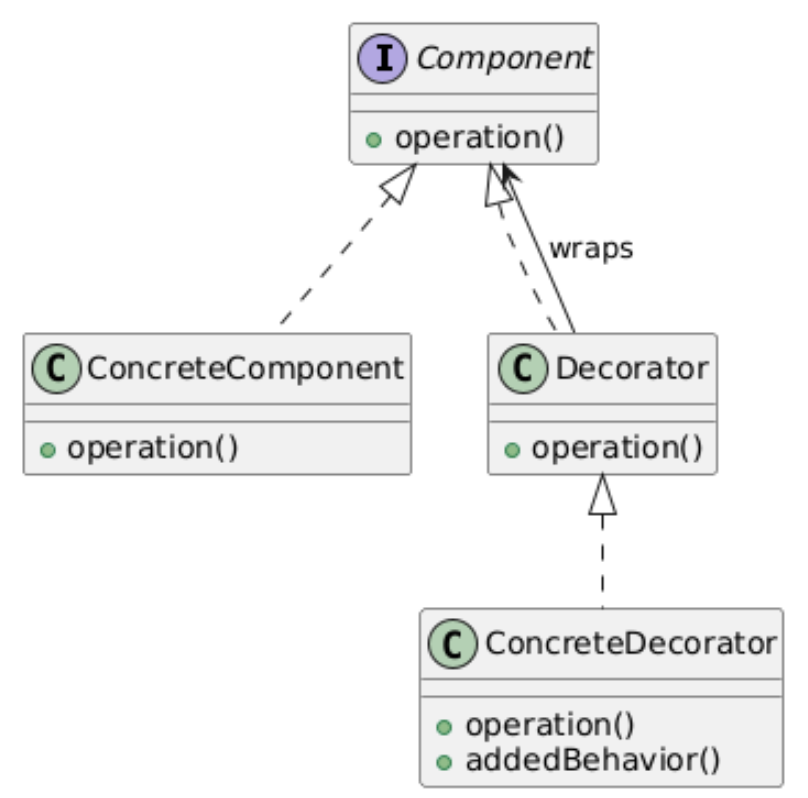
7. Decorator(装饰者模式)
类别:结构型
说明:动态地为对象添加行为,而无需修改其类。
使用场景:当需要动态扩展功能时。
独特性:包装对象以添加行为。
常见用例:日志记录、缓存、权限、安全包装。
UML图:
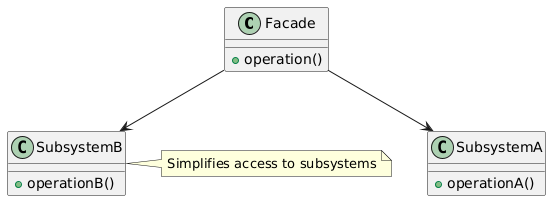
8. Facade(外观模式)
类别:结构型
说明:为子系统中的一组接口提供统一的接口。
使用场景:当需要简化复杂子系统供客户端使用时。
独特性:隐藏复杂性,提供简单接口。
常见用例:API网关、复杂库、应用程序。
UML图:
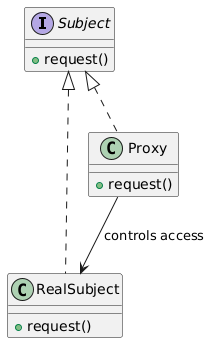
9. Proxy(代理模式)
类别:结构型
说明:为另一个对象提供代理或占位符以控制访问。
使用场景:当需要控制对象访问时(例如,延迟初始化、安全、远程访问)。
独特性:作为受控访问的中间人。
常见用例:延迟加载、安全代理、远程代理。
UML图:
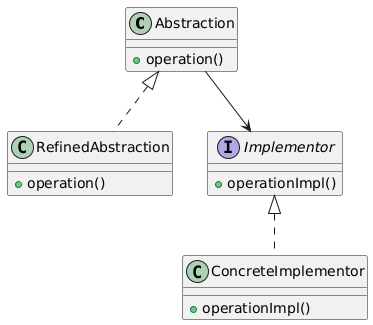
10. Bridge(桥接模式)
类别:结构型
说明:将抽象与实现解耦,使两者可以独立变化。
使用场景:当抽象和实现需要独立扩展时。
独特性:分离抽象与实现。
常见用例:跨平台GUI框架、设备驱动。
UML图:
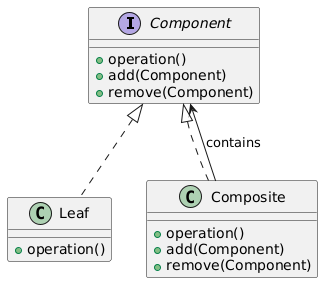
11. Composite(组合模式)
类别:结构型
说明:允许以统一方式处理单个对象和对象组合。
使用场景:当处理树形结构时,组件和组合需要一致处理。
独特性:表示部分-整体层次。
常见用例:文件系统、UI元素。
UML图:
12. Observer(观察者模式)
类别:行为型(Behavioral)
说明:定义对象间一对多的依赖关系,当状态变化时通知所有依赖对象。
使用场景:当多个对象需要对状态变化做出反应时。
独特性:封装事件驱动通信。
常见用例:事件处理、UI框架、发布-订阅系统。
UML图:

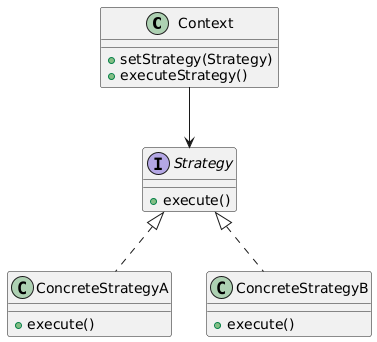
13. Strategy(策略模式)
类别:行为型
说明:定义一组算法家族,使其可互换。
使用场景:当需要在运行时选择行为时。
独特性:封装可互换算法。
常见用例:排序算法、验证策略。
UML图:
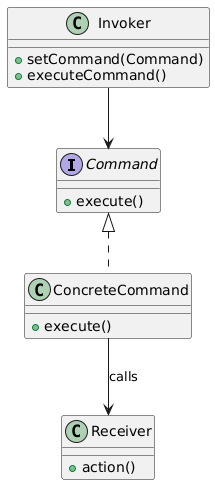
14. Command(命令模式)
类别:行为型
说明:将请求封装为对象,允许参数化客户端。
使用场景:当需要撤销/重做功能或排队请求时。
独特性:将请求封装为对象。
常见用例:事务系统、撤销/重做、远程操作。
UML图:
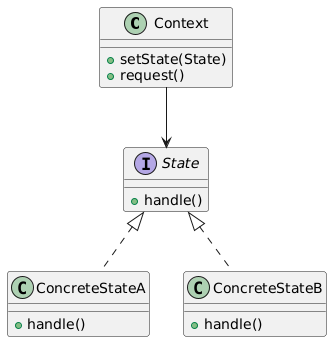
15. State(状态模式)
类别:行为型
说明:允许对象在其内部状态改变时改变行为。
使用场景:当对象行为随状态变化时。
独特性:封装状态特定行为。
常见用例:状态机、工作流管理。
UML图:
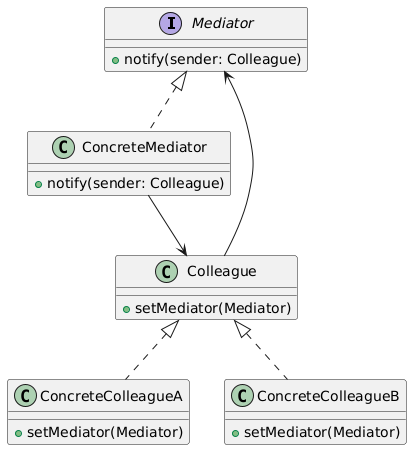
类别:行为型
说明:定义一个对象,封装对象间的交互。
使用场景:当需要减少对象间的直接依赖时。
独特性:集中通信。
常见用例:聊天室、事件处理、消息系统。
17. Chain of Responsibility(责任链模式)
类别:行为型
说明:将请求沿处理者链传递,直到一个处理者处理它。
使用场景:当请求处理者需要动态处理时。
独特性:允许动态处理者委托。
常见用例:日志框架、事件传播。

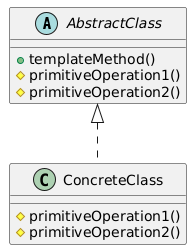
18. Template Method(模板方法模式)
类别:行为型
说明:定义算法骨架,子类按步骤填充。
使用场景:当需要强制执行一系列步骤但允许灵活性时。
独特性:封装算法结构。
常见用例:框架、算法定制。
UML图:
工厂模式名称和别名的由来
- 简单工厂(Simple Factory)
名称由来:被称为“简单”是因为它是最基础的工厂模式,逻辑简单,集中在一个类中。
别名:有时称为“静态工厂”(Static Factory),因为创建方法通常是静态的。
原因:它不属于GoF的23种模式,但因其简单性和实用性被广泛使用。
- 工厂方法(Factory Method)
名称由来:强调“方法”这一核心概念,工厂方法模式通过定义一个方法(factoryMethod())来创建对象,具体实现由子类决定。
别名:有时称为“虚拟构造器”(Virtual Constructor),因为它通过多态性“构造”对象。
原因:通过方法的多态性实现对象的创建,符合面向对象设计原则。
- 抽象工厂(Abstract Factory)
名称由来:被称为“抽象”是因为它定义了一个抽象接口(或抽象类)来创建一组对象,具体工厂实现由子类提供。
别名:有时称为“工具包”(Kit),因为它提供了一套创建相关对象的工具。
原因:它抽象了产品家族的创建,适合需要创建一组相关对象的场景。
总结
工厂模式对比:
简单工厂:最简单,但扩展性差,适合小型系统。
工厂方法:关注单一产品,扩展性好,符合开放-封闭原则。
抽象工厂:处理产品家族,适合复杂对象创建场景。
名称由来:工厂模式名称反映了其核心特点(简单性、方法、抽象性),别名则源于其功能或实现方式(如静态工厂、虚拟构造器、工具包)。
UML图:通过类图展示了每种设计模式的结构和关系,帮助理解其实现方式和适用场景。
总结
创建型模式(Singleton, Factory Method, Abstract Factory, Builder, Prototype):关注对象创建,解决实例化问题,适合需要动态或复杂对象创建的场景。
结构型模式(Adapter, Decorator, Facade, Proxy, Bridge, Composite):关注对象和类的组织,简化结构或扩展功能,适合处理复杂系统或接口兼容性。
行为型模式(Observer, Strategy, Command, State, Mediator, Chain of Responsibility, Template Method):关注对象间的交互和职责分配,适合动态行为或事件驱动系统。
Comment and share